
I made a cake with a white chocolate peony
I admit, the title of this post is misleading. I had help. But the main thing is, I actually made a red velvet cake covered in white chocolate icing topped with a white chocolate peony, proving you can do anything as long as you have the internet telling you how.
Although I am an avid fan eating cake, I’ve never been into baking. Many years ago, I attempted to bake some sort of chocolate cake or brownie or something and it didn’t work. I say “attempted”, what that actually meant was that I didn’t look at any recipes and just thought I could improvise and throw together some flour, eggs, milk, chocolate and whatever else I thought went into a cake together based on what I had seen on TV, put it in the oven and something would happen. It was from this that I learnt that that wouldn’t work and that baking is chemistry; a specific formula that if not followed perfectly, you won’t get a cake.
Unlike cooking where flair and improvisation can be encouraged by throwing in a bit more pepper or a dash of salt and topping it off with your own secret combination of herbs and spices, baking doesn’t really have that room for error so where’s the fun? Particularly when it goes wrong and you don’t get to eat cake at the end of all the hard work. And hence, I never bake. But I am of course always happy to buy cake. Or encourage others to make cake for me to compliment. And then consume.
So last year a friend of mine, the very awesome Stubborn Cook, made a cake and posted pictures on her Instagram and I was so amazed that I asked if she’d make me one for cute girlfriend’s birthday. She kindly agreed and repeated all her hard work and perfected baking skills to make this artwork:
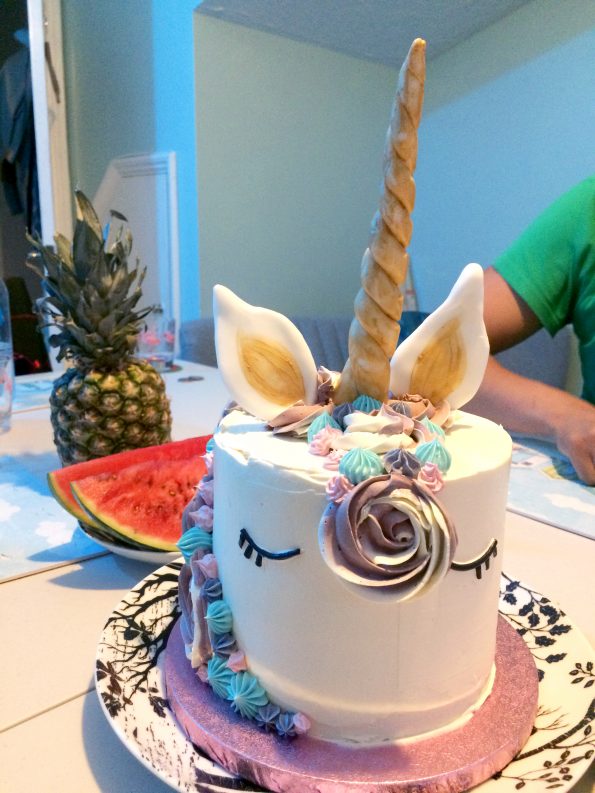
It looked and tasted amazing. But needless to say, I had now set the bar quite high for cute girlfriend’s birthday cakes each year. This may have been a mistake that I wouldn’t come to realise until this year.
A couple months ago, I started thinking what I should do for cute girlfriend’s birthday and remembered the amazing cake I got last year. So how do I do better than that!? I asked her what cake she would like this year and she gave me nothing other than “a white chocolate one please”. I don’t think I’ve ever had a white chocolate cake before, I don’t really know much about cakes in general other than eating them so what kind of white chocolate cake could I get that would be better than the unicorn cake!? The challenge became interesting and so I started coming up with ideas for a white chocolate cake that’ll be better than last year. I came to the conclusion that I couldn’t do better than last year and as I was running out of time, so I decided to go simple. I gave Stubborn Cook a call and asked her if she could make a white chocolate cake with a peony on top but she was unfortunately unavailable and wouldn’t be able to make one in time.
So, plan B, see if I can get one made at a bakery. I did some googling, found some bakeries and started calling around.
Me: “How much would it be to get a 6 inch white chocolate cake with a white chocolate peony on top?”
Bakery A: “Well, all our cakes start from £200″
Bakery B: “We charge £300 minimum”
Bakery C: “That’ll be £250”
Wait. What?! £200-£300 for a cake!?!? This will be consumed within an hour. It will serve about 8 people. Who is paying that much for a small cake?! I’ve paid less for a weekend in Menorca. You want me to pay £200-£300 for a cake?! No.

Like a real man, I turned back to the googles and changed my search from “where to buy” to “how to make”. And after 10 minutes of reading recipes, like a real man, I texted my sister to ask for help.
And as a good big sister she agreed to assist me. Meaning, she agreed to make the cake entirely whilst I would occasionally do things like hold a spoon to prove myself helpful.
I found a little step by step tutorial online on how to make the white chocolate peony by Korena in the Kitchen and thought, this looks easy enough. My sister was reluctant saying “why don’t you just buy a real peony and stick it into the cake?”. But no, I was channeling the spirit of Cake Boss and said the peony must be made out of edible white chocolate; I had set my mind to it and I had full confidence that I (she) would be able to make it.
I then decided that the cake will be red velvet as I know cute girlfriend likes red velvet but more importantly, I have previously had a red velvet cake by my sister before and it was good. I also learned that red velvet cake is actually just a chocolate cake with red food colouring and although some would get that red colouring naturally from beet root, that sounds kinda disgusting. Food colouring it is.
And so the plan was set, however, of course as baking is merely a hobby for my sister, I would obviously need to invest in some additional tools. Firstly, the tools listed in the guide by Korena in the Kitchen such as the metal ball stylus, the shaping foam and the silicone mats were easily all found on Amazon. I even got the white chocolate from Amazon – I got the Callebaut Select W2 which I have no idea if it’s the one I should’ve used but it tasted awesome. It was basically expensive tasting Milky Way. I even bought the cake spinning top thing for decorating which also came with a couple of palette knives. Another little addition I got was some edible spray paint to give the cake a bit of colour, and to be honest, sounded easier than painting the cake with a brush. More on that later.
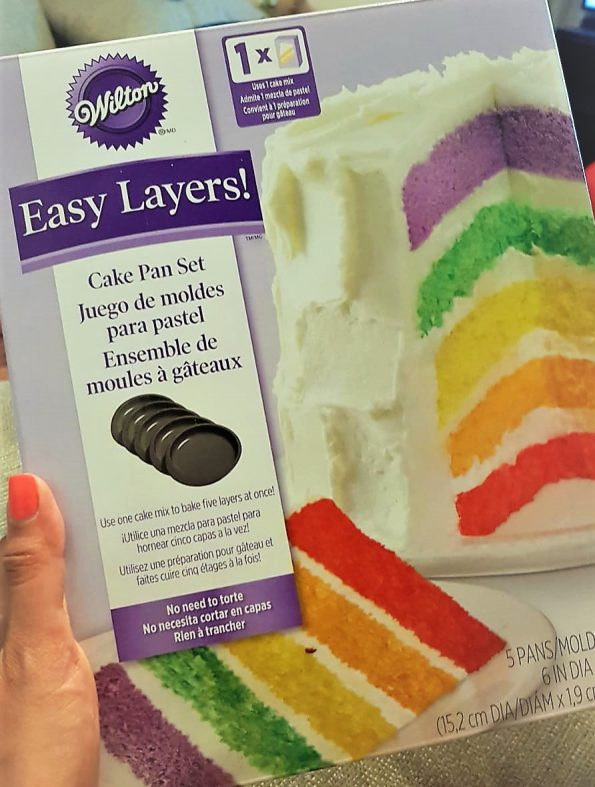
But one thing that my sister already owned which was quite useful was this Easy Layers thing. Probably saved us tonnes of time by allowing us to make 5 layers in one go. I mean, it has “easy” in the name of the product.
Anyway, shopping list done, I had all the tools I needed to make the cake, now a trip to Tesco for the ingredients. Of course, I have no idea how to bake a cake so I ask my sister what I need to buy. She sends me this:
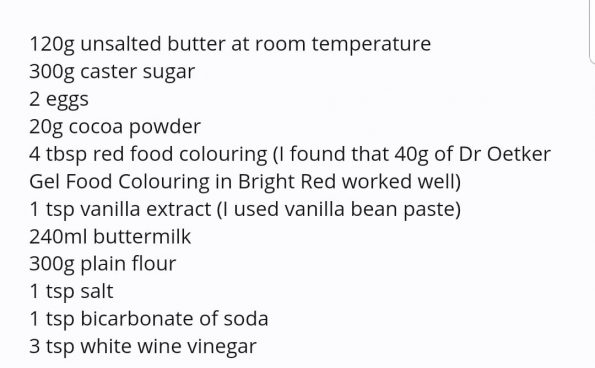
This is apparently her “secret” recipe that she once shared with a friend who then became a baker and uses this recipe professionally. Or something like that. Basically, it’s a good recipe which she gave me permission to share. Not so secret then. And so upon my trip to Tesco, I found there’s actually a home baking section; who knew!? Probably a lot of people. But it was indeed very easy to find all these ingredients.
Round 1 – The Tester. My sister and I agreed to make a test cake ahead of time to ensure that the cake would taste nice and that we could actually make the peony. So a little white lie to cute girlfriend about my whereabouts saying I had to take my sister home for no good reason cause I couldn’t think of a better lie and here we are (she doesn’t really buy it but accepts).
Then suddenly my sister proves her experience a baker as she confidently starts throwing ingredients together in a mixing bowl and before I knew it, she was putting in the oven. I helped by giving positive re-enforcement.
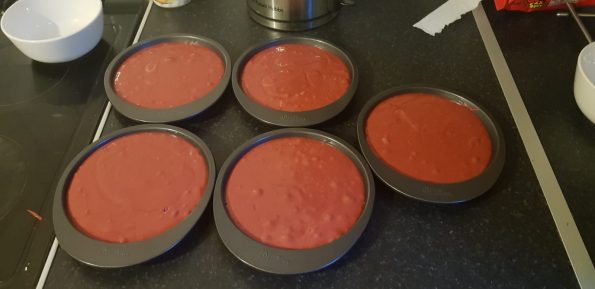
The Easy Layers thing worked great although they weren’t perfect cylinders which meant stacking the layers were a bit like stacking 5 pies or really wide cup cakes. We read that we could’ve cut the edges off to give it more clean cut sides but that would mean a smaller cake so the only thing we could’ve done to even it out was to fill the gaps with icing which we did although we didn’t get the icing sugar right, it was too thick then we added water and it suddenly to runny.
So the test cake didn’t come out great – aesthetically. Then taste wise, we discovered that a red velvet cake with white chocolate icing is really sweet. But I like sweet. The one thing we did learn was that it is actually important to use unsalted butter as I chose to use “Stork” butter because it said “perfect for baking”. But they lied! It’s not perfect for baking. It makes your cake salty.
Then the test flower. This was a bit of a shambles. Korena in the Kitchen says to make the white modelling chocolate, simply melt some white chocolate and add some syrup then presto chango, white modelling chocolate. It didn’t work. I did as instructed and got some thick mouldable white chocolate which I left out to cool down. But when I returned the next day, after another white lie to cute girlfriend, this time saying I was playing pool with a friend for the evening (she doesn’t really buy it but accepts), I picked up the white chocolate to start working with it and it started to crumble and so came the serious discussion. Should we use more of the fancy Belgian white chocolate to make another batch that will potentially fail or get some ready made white modelling chocolate from Amazon Prime? The latter obviously. I used Squires Kitchen Modelling Cocoform White.
A couple days later, once the ready made modelling chocolate had arrived, and this time an acceptable alibi that I’m watching the football with my brother in law, my sister and I return to attempt the peony. Now, truth be told, we did watch the football, and this was actually the day that England lost to Croatia in the World Cup semi-final. So to be honest, I was tired. After a long football game with extra time and all the emotions and screaming at the TV hoping Harry Kane would hear my advice, it probably wasn’t the best time to start making the peony. But unlike England, we pushed forward.
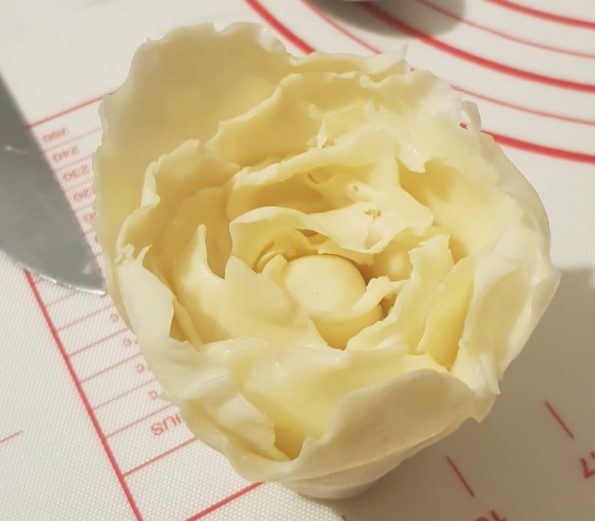
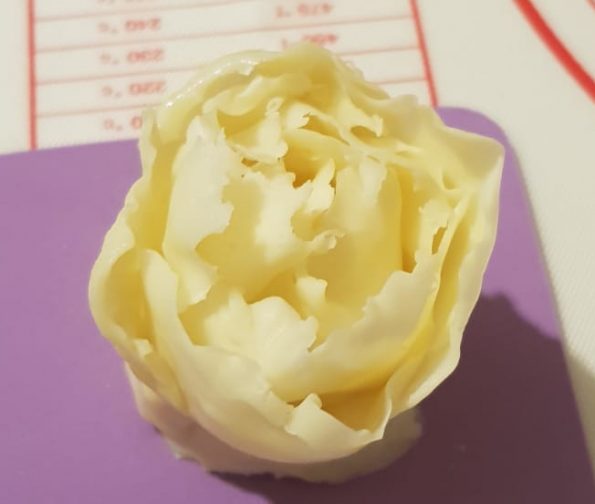
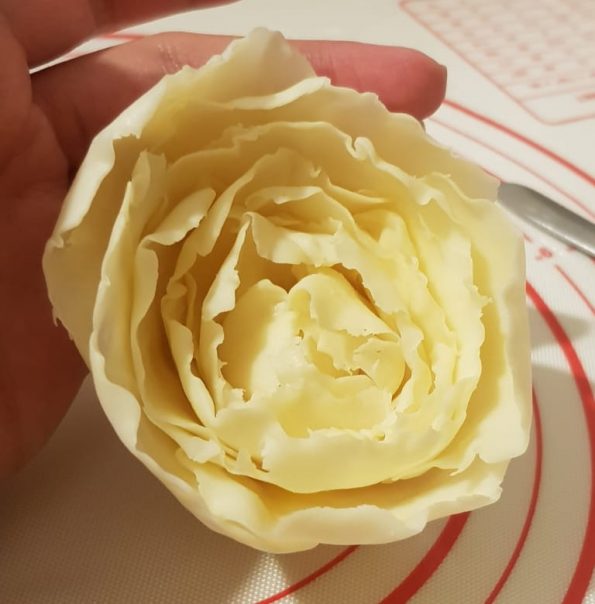
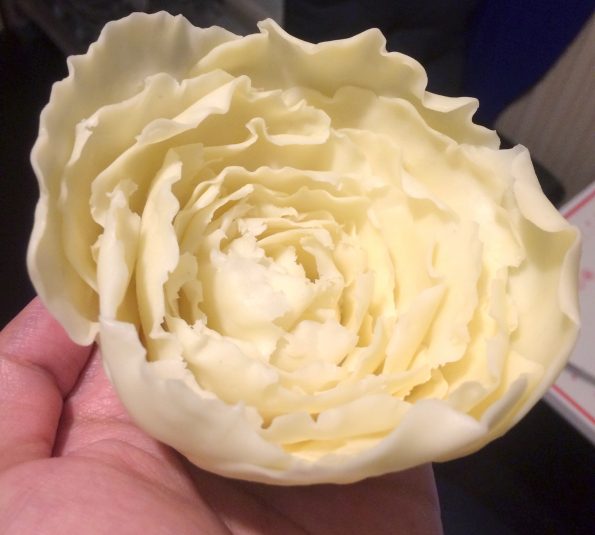
Following the tutorial by Korena in the Kitchen, we found it was surprisingly easy and after making each individual petal we made this:
Overall, I was pleased with the result despite the fact that it was late, we were rushing and I was in a bit of a foul mood that the England dream was over. We really tried to get that curving in effect on the petals to replicate the peony however the end result kind of looked more like a rose. It needed more layers to look like a peony, and I felt it needed to be more closed. I also decided this was a good opportunity to test some of the spray paint and found that the “rose gold” colour wasn’t very pretty at all. It looked more like a bronze and if anything, made the flower look like it was weltering. Thankfully, I had also bought pink spray paint as a backup which looked a lot nicer.
So a few lessons learnt and a few things to consider for when we were going to make the final cake. Use unsalted butter, make sure the butter is at room temperature before making the icing (thanks YouTube), don’t use the rose gold spray paint but most importantly, don’t do delicate chocolate modelling when you’re a bit emotionally drained from a sporting event.
Fast forward a week or so and with some restocking of ingredients including unsalted butter, we’re ready for the final piece. White lie to cute girlfriend that I’m babysitting my nephew for the evening for no good reason (she doesn’t really buy it but accepts) and we’re ready to make a start. As like the previous attempt, the baking of the actual cake went relatively smoothly. Although we did have an issue with getting the cake out of the Easy Layers tins. This may have been because we made sure the butter was at room temperature before using it, or maybe it’s because we were more thorough with the mixing to make it fluffier, or maybe it was because we decided to grease the tins this time. Whatever the reason, it was quite annoying as the cake was very difficult to get out of each tin and we lost a fair amount to crumbling.
No problems however, cause we can of course fix all of this with icing. And this time, we were prepared. We used:
- 200g of melted white chocolate
- 200g of unsalted butter
- 300g of icing sugar
Following some YouTube videos, we made sure we were using room temperature unsalted butter. Used that hand cake mixer machine thing to beat it until it was soft and fluffy, added the icing sugar (through a sieve – this is actually quite important apparently), then added the melted white chocolate (after it had cooled down a bit). We then continued to beat it with the mixing machine until it was soft and creamy. Then into a piping bag to fill all the gaps. The only issue really was that because it was white chocolate icing, it occasionally got a bit oily but I just beat it again with the mixing machine and it was good to use again.
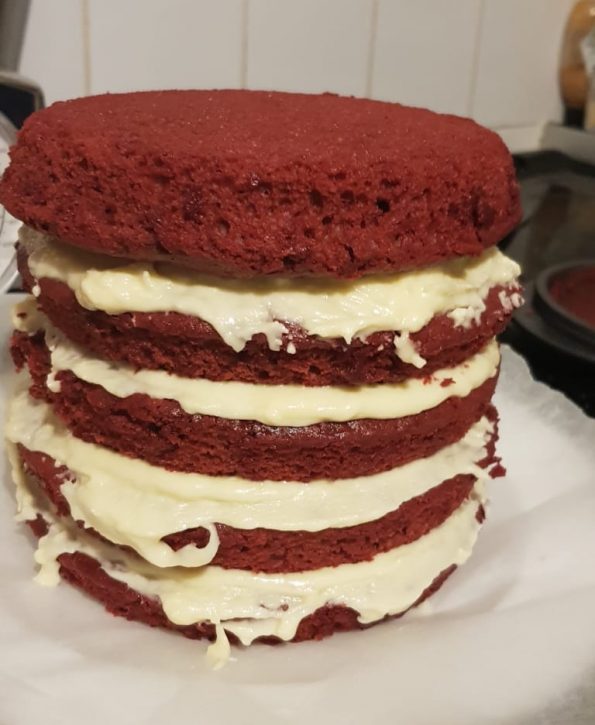
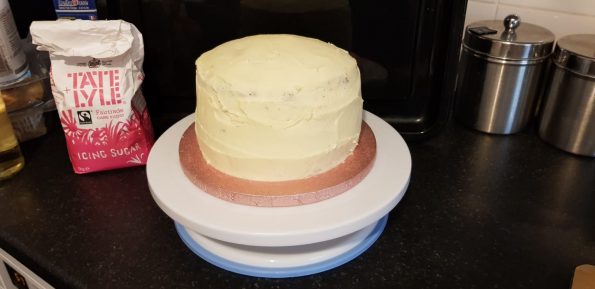
Then here’s a little trick/tip (or maybe common knowledge that everyone already knew, but I didn’t), apply a thin layer of icing all over the cake using the palette knife then put in the fridge to harden. After 10-20 minutes, it’ll be a lot easier to put on the final layer of icing and even out any gaps. And lo and behold, I made a cake:
Then onto the flower. The next day, I give another little white lie to cute girlfriend, this time that I’m at a colleague’s leaving drinks. We crack open the ready made white modelling chocolate and get to work, this time with the intention to make thinner petals but more layers. However, where would the fun be if we weren’t up against mother nature herself. In the midst of a rare London heatwave, modelling white chocolate is almost impossible. We first tried to do this by wearing rubber gloves but then concluded that the rubber gloves were in fact making our hands even hotter. And so the only solution we had was to make each layer then to put it in the fridge to cool. That meant countless breaks whilst we wait for the chocolate to cool down and set in place which of course meant this nearly quadrupled the time we should’ve spent on it and hence this took 4 hours.
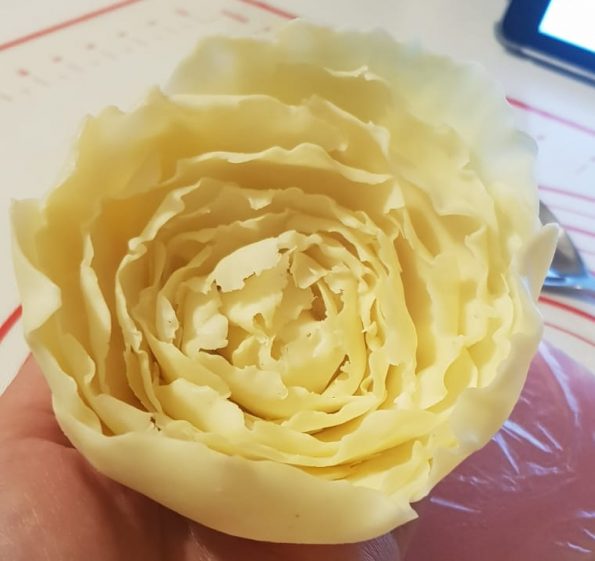
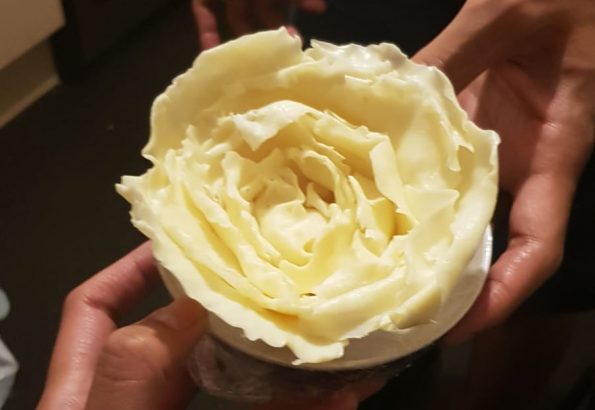
But patience pays off as we ended up with this beauty:
Obviously, I was pleased with this. A little trick we did actually was cut off the bottom half of the flower (as the multiple layers started making the base quite large) with a string which was a lot easier than using a knife. I did however skip the last step of Korena in the Kitchen’s tutorial and didn’t do an outer layer using a bowl. I chose not to do this as I didn’t think it would help with the closed shape that I was going for however in hindsight, this may have helped give the flower an overall more rounded look. Basically, I don’t know better than the internet. Don’t argue with the internet, just do what the internet says.
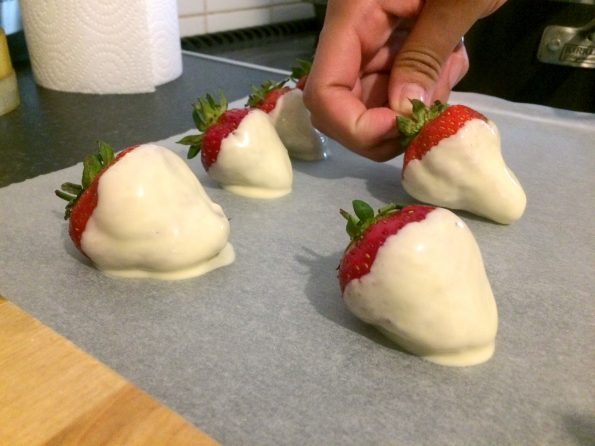
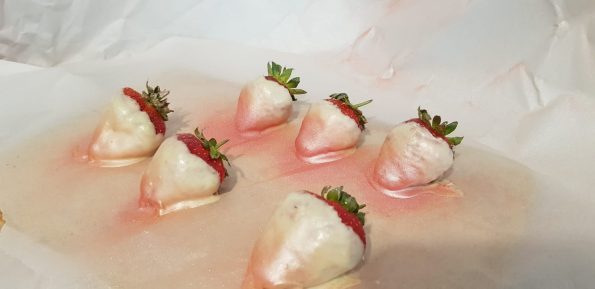
So the cake was done, and the flower was done. Into the fridge to set and ready for the next morning to do the finishing touches. Little white lie to cute girlfriend that I woke up late but I had in fact actually woken up at 7am on a weekend to go to Sainsbury’s to get some strawberries. And so we’re ready to put it all together. I start with the strawberries as they’ll need time to set so I (my sister) simply melts some of the fancy Belgian white chocolate ready for dipping whilst I picked out the best looking strawberries.

Now of course I had to do a taste test at this point so I picked up one of the uglier strawberries and dipped it in the warm white chocolate. Wow. It tasted amazing. Who cares if white chocolate isn’t really good for you, strawberries covered in melted white chocolate is quite simply an unmissable taste. Following the compulsory taste test I laid out a sheet of greaseproof paper then carefully placed the strawberries down. Then into the fridge to allow them to set.
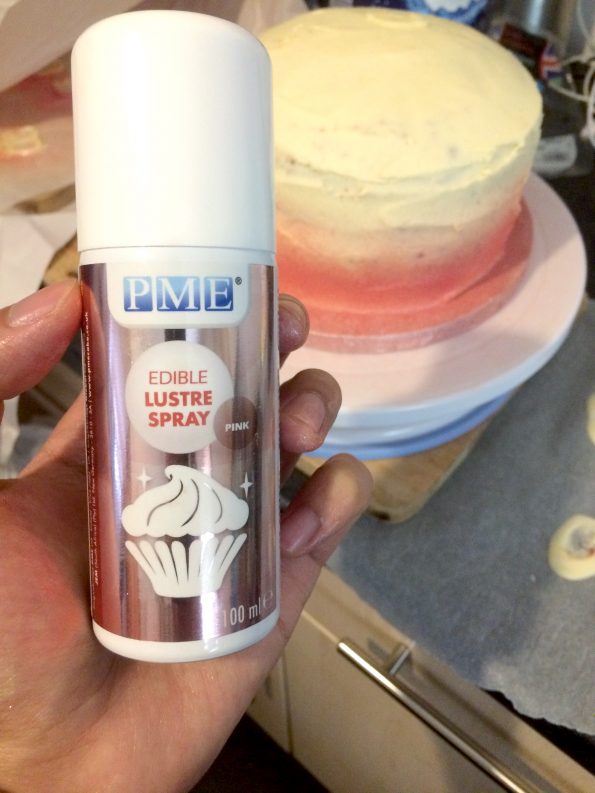
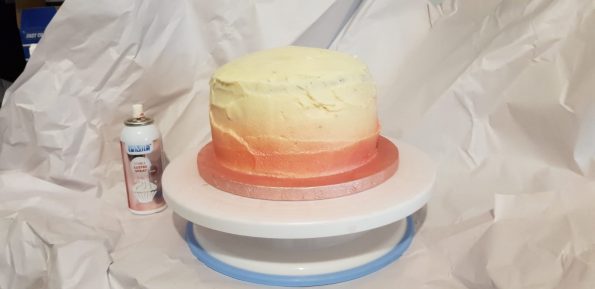
As we waited for the strawberries to set, we turned our attention to the cake. It was time to add a bit of colour. And as we had already established that the Rose Gold PME Edible Lustre Spray looked a bit rubbish, I decided that pink was the way to go. And this is where the cake spinning top thing really became useful. We made a spray painting area on the counter by basically just covering as much as we could with paper then we were ready to go.
My sister wouldn’t accept the responsibility of spray painting at this point in case it goes wrong so it’s time for me to step up. I decided to go for a gradient from the bottom up making the cake blend seamlessly into the cake drum I got from CakeCraftWorld (which was supposed to be Rose Gold but actually looks more like pink so worked perfectly with the pink spray paint). The stress of spray painting suddenly started to get to me as I thought there was no turning back now. There’ll be no chance of making another cake if I screw this up and so if I do get it wrong, I’ll just have to spray the whole cake. But carefully and patiently spraying from the bottom of the cake upwards and as I slowly span it round gave a perfect and even gradient around the cake.
By this point the cake’s white chocolate icing was already starting to melt slightly so it goes back into the fridge before moving on. Quickly checking on the strawberries and they haven’t set yet so we move onto the peony. I didn’t want to spray the whole peony pink. Then I decided I also didn’t want to spray the base of the pink to get the same gradient effect I’ve done on the cake. To be honest, I kept looking at the peony admiring our good work and thinking I just didn’t want to ruin it. But the spray paint was expensive so I insisted on spraying everything to make use of it. I decided just to give a very light spray on the peony just to give it hints of pink.
The result was perfect, the spray paint just caught on the edges of each petal giving it just a little bit of definition and shine from the glitter. Speaking of the glitter, the white paper that we put up to shield everything from the spray paint didn’t really work. The glitter went everywhere. You could see it floating around the kitchen even minutes after we had finished spraying. And it wasn’t just surfaces and appliances covered in glitter. I was covered in glitter. My sister was covered in glitter. My nephew was covered in glitter although he found it funnier than I did. No time to shower so if cute girlfriend asks why I’m covered in glitter, it’ll just have to be another white lie that I just came from a local strip club.
An hour left before I need to leave to meet cute girlfriend but we’re almost there. We put the peony back into the fridge and turn our attention to the strawberries. They still haven’t set. My sister starts to panic and urgently starts emptying out her freezer to speed up the process. She starts pulling out very old foods that should’ve been thrown away weeks ago and a box of fish fingers which actually only had 1 fish finger left inside. With enough of the freezer cleared out, she carefully places the strawberries into the freezer and we wait. 20 minutes later and this is it, it’s now or never. We take them out the freezer and thankfully they’ve hardened. I crack open the spray paint and get ready to give them a spray. I don’t want to hide that they’re covered in white chocolate so I go for the same gradient look that I’ve done on the cake. My sister compliments my idea and I suddenly feel like our roles have been reversed; she is now the one giving positive reinforcement whilst I confidently do the difficult tasks and at this point I now feel like I’ve grown better in my baking skills and just generally as a person.
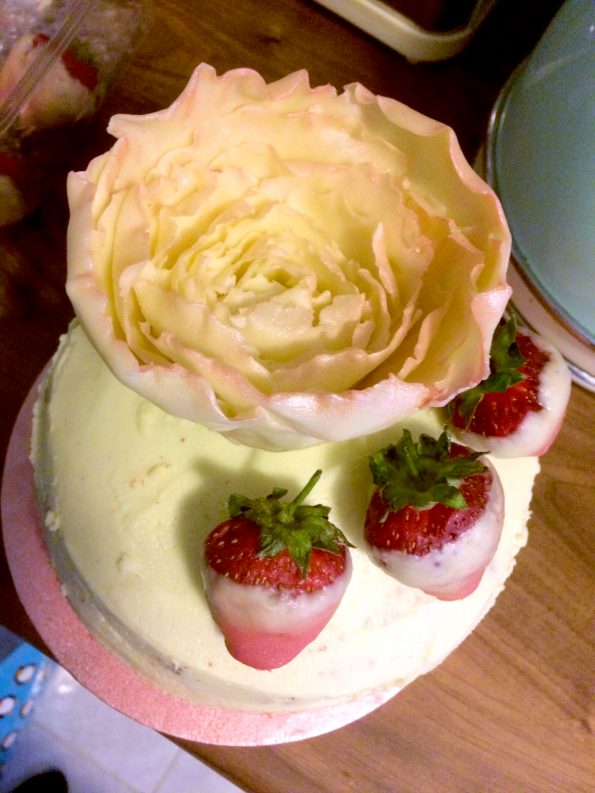
15 minutes left before I have to leave and now to put it all together. The cake and the flower come out of the fridge and onto the spinny thing. I add a bit of left over white chocolate icing onto the cake and place the peony on top. As the top of the cake isn’t perfectly flat, the flower doesn’t look like it’s very secure even with the icing holding it in place. My sister says maybe I should put it all together when I get there. Running out of time, so quick decision made, we pack up the cake, the peony and the strawberries separately ready for transport. Unfortunately, as the strawberries set on the greaseproof paper, that annoyingly meant the white chocolate didn’t stick to the side that was touching the paper. But that’s fine, that side will be on the cake and not on display anyway. We load everything by the front seat of my car then I’m on my way.
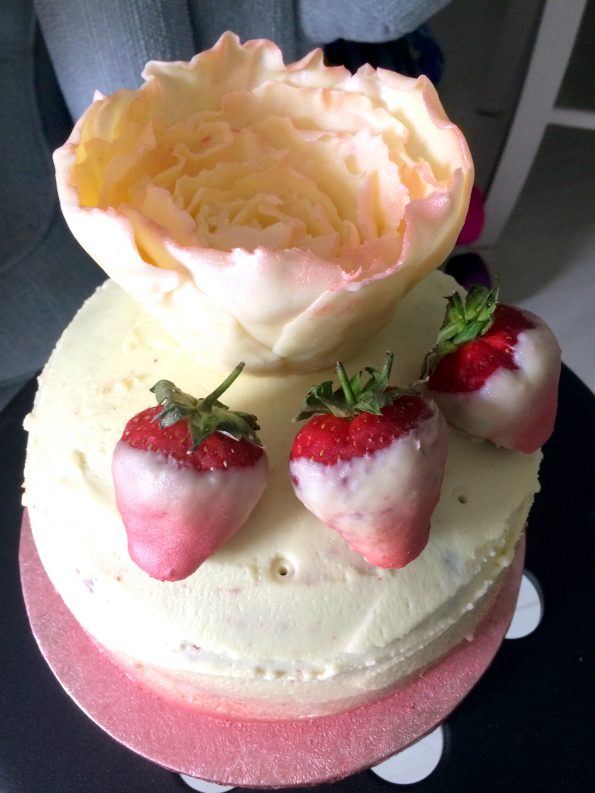
30 minutes of careful driving with the air con blasting on full to keep the cake from melting and I arrive at cute girlfriend’s sister’s house. It goes into a cool bag (no room in the fridge) ready to be presented later on. We return that afternoon then I sneak off into the kitchen to finally assemble the cake. With some white chocolate icing in a piping bag, I pipe quite a lot of icing onto the top of the cake to hold the flower and stop it from sliding off the curved top of the cake. It sticks. I then repeat the proceedure for the strawberries step back to admire my work in all it’s glory.
It’s done. It looks amazing. I’m extremely pleased and relieved that it’s finally done. Although I do notice that I now can only fit 2 candles onto the cake but I don’t care, the cake is finally done. I light the 2 candles and carefully pick up the cake to present to cute girlfriend in the next room. I laugh to myself briefly as I pick up the cake thinking, wouldn’t it be hilarious if I just dropped the cake now?! Ha! Haha! Not funny.
I slowly enter the room as cute girlfriend’s face drops with pure confusion. Her family starts singing “Happy Birthday” as she simply stares at the cake in front of her. I can’t actually tell if she likes it or not. I think, she better bloody like it. As everyone stops singing she simply asks “where did you get this cake?” to which I simply reply “I made it”. She doesn’t believe me. She turns to her sister but her sister backs up my story. She turns back to me completely speechless. She finally builds the courage to say something. Waiting patiently to hear what she thinks she asks “did your mum help you?”, her sister corrects her and says that my sister helped me. It suddenly becomes more believable and starts to accept the reality that I made her a cake.
I push to get the cake cut open so I can see how it looks on the inside. I remove the peony and hand her a knife and she makes the cut still confused to the fact that I made her a cake. Thankfully it all came out well. The red food colouring worked perfectly and it is indeed a 5 layer red velvet cake with white chocolate icing.
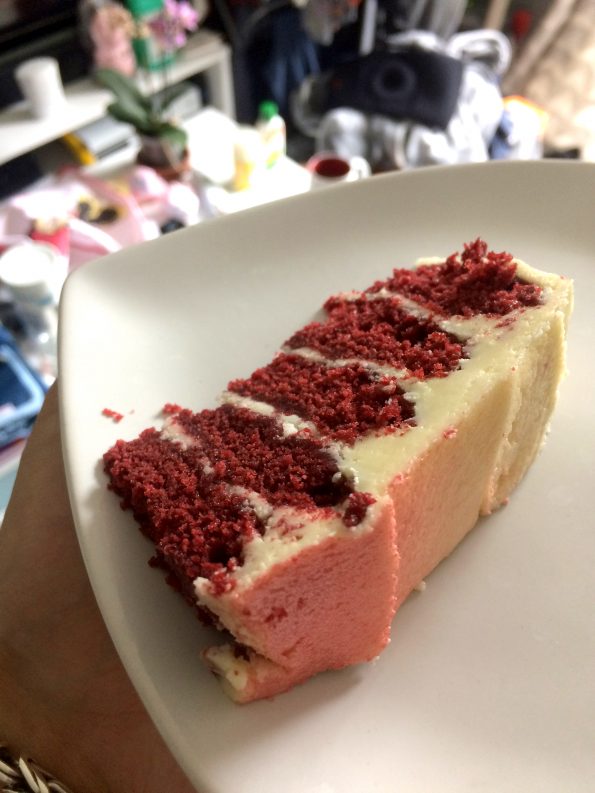
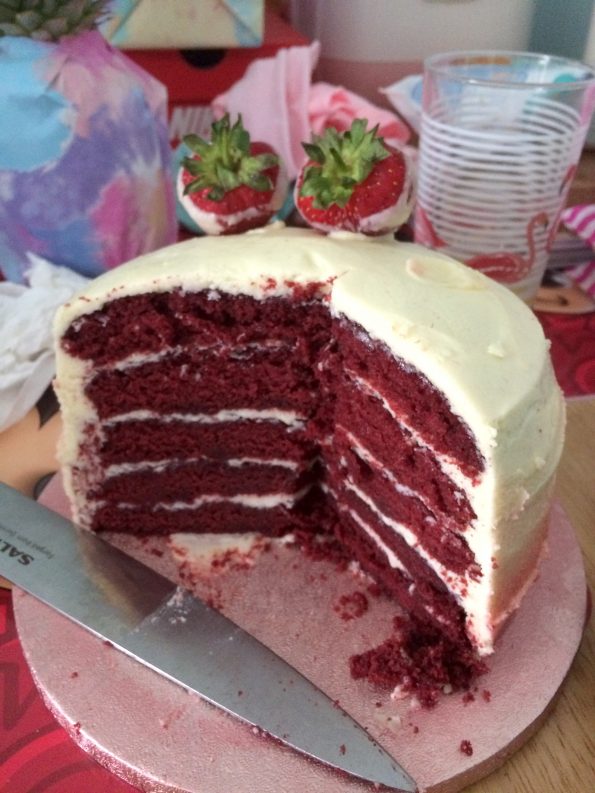
It tasted as sweet as expected with a slight satisfaction that I made this. But more of a satisfaction that it’s finally all over. I explain to cute girlfriend how much I had to do to get the cake made and she can’t believe that I actually made it. More that we made that peony ourselves. But as I sat there eating the cake watching my hard work literally disappear into everyone’s mouths, I think about what I’ve achieved. I have learnt how to bake a cake, how to make a peony out of white chocolate, how to correctly put icing on a cake, got all the tools to do it again, and all for less than I would’ve paid if I got it made at a bakery. But most importantly, I surprised cute girlfriend and made her happy. And I did so by constantly lying to her for the whole month.
So after all that, was it worth it? No. I’m glad I did cause it was a challenge completed and I like challenging myself but I’ve done it now. That was a lot of effort but the important thing was that cute girlfriend was pleased, and it was at least worth the look on her face when I told her I made it. I’m knackered, I’m glad it’s over. Thanks to my sister who firstly agreed blanketly to help me, then awesomely did most of the work and allowed me to leave her kitchen and her son covered in glitter. And respect to all the bakers out there but obviously you’re more equipped and more experienced to do this and it wouldn’t take you as much time as it took me make it. If you don’t bake regularly, or in my case, not at all, it’s just not worth it. Spend the money on the people who can get it right first time. So if you’ve read this and now want a similar cake made, don’t ask me.
Cute girlfriend – Happy Birthday, I hope you liked your cake but next time you’re getting one from Iceland.